
This page may contain affiliate links. Read my full disclosure for more info.
Have you always wanted to start a blog?
Do you want to share your personal hair photos, videos, and tips, or to start a business?
If so, read on and you can have your site up and running within one to two hours.
At my day job, I’m a web developer. Over the years I have set up dozens of websites and blogs for people. After using more different tools and platforms than I can remember, what I use and recommend most is WordPress.
WordPress is a tool that allows you to create and build a website that is easy to update yourself.
You can have a web developer like me set up the site and take over from there adding and updating the blog posts yourself.
Another option is set up the whole blog yourself, no web developer required. Today I’m going to break down all the steps you need to create your own blog.
Self Hosted WordPress vs WordPress.com
In order to have the maximum flexibility to eventually make money from your blog, you want to set up a self-hosted WordPress site. “Self-hosted” means that your site lives in your own hosting account, instead of creating it at WordPress.com.
Even if you don’t plan to make money right now, a self-hosted site will give you options that won’t require you to move your whole site if you change your mind down the line.
To set up a self-hosted site is easier than it may sound. You will set up an account with a hosting company, and use the following step by step instructions to install WordPress. Done.
If you have been thinking about starting a blog for awhile now, you probably have a name in mind. This name will become your domain name – the address where people find you on the web, ie www.yourblogname.com. Have this name in mind for the next step.
Set Up Hosting
Let’s set up your hosting account. A web host is a company that sets up your website so that the whole world can see it.
Many people recommend Bluehost, and it seems to be a good hosting option, but I’m going to recommend HostGator instead since I’ve used them for years, and I know and like the product.
HostGator’s pricing is reasonable, their customer service is good, and they have a variety of options that will serve you well as you start your blogging journey and as you grow.
Here’s what they offer in their basic package:
- Free SSL certificate for security
- Email addresses, eg yourname@yourblogname.com
- Super fast site speed
- 24/7/365 customer support
- Support for up to 100,000 visitors
- Automatic daily backups and virus removal keeps your hard work safe
- Unlimited storage space
- Sitelock hacker protection
- Google Analytics for WordPress to monitor your website’s traffic
They offer a 45 day money back guarantee, so if you’re not totally satisfied, you can cancel.
To sign up, go to hostgator.com.
We’re going to sign up for the WordPress Cloud Hosting Starter Plan.
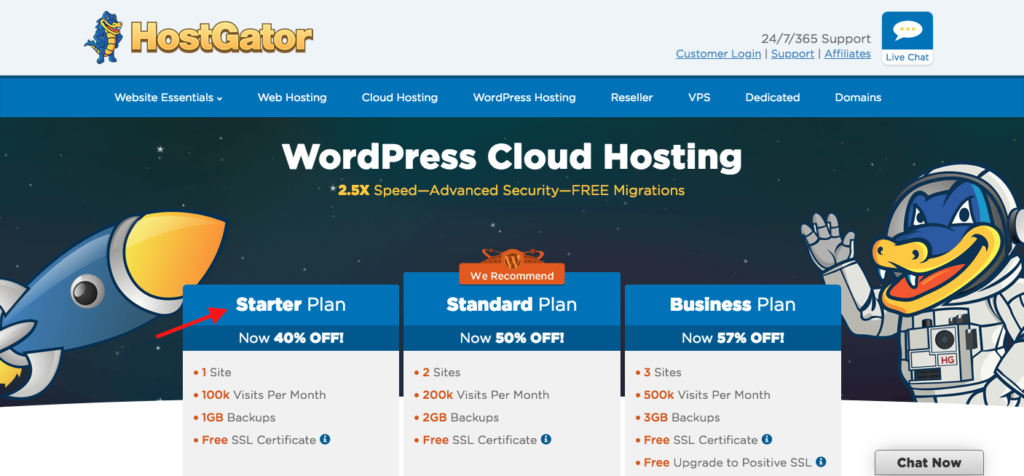
At the time of this writing, if you sign up for a three-year plan, you can lock in their promotional rate of $5.95/month for the three years. Otherwise, an annual plan is $7.95/month and a monthly plan is $14.95/month.
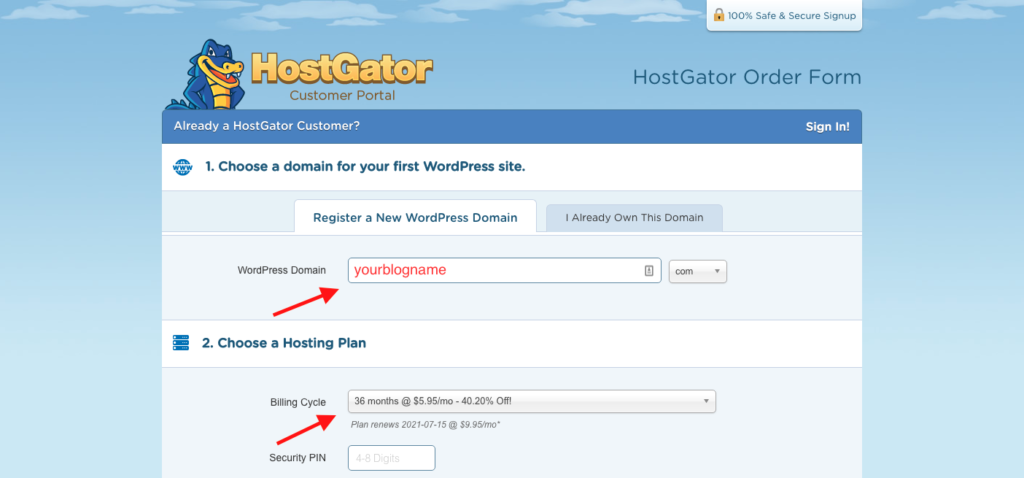
Enter your domain name, choose your plan, complete the remainder of the form and click “Checkout Now!”
After checkout, you will receive a welcome email with all of your account information.
Set Up Your Blog
Visit portal.hostgator.com and log in.
Under the Hosting tab:
- Click WordPress Manager
- Click Create Blog
On the Add New WordPress Installation screen:
- In the WordPress URL field, enter your domain name, ie yourblogname.com
- In the Blog Title field, enter your blog’s name
- Click “Add Blog”
- You will see a message saying “Installation Pending.” After a few minutes, if you refresh the page, the message will change to “WordPress Installed.”
Set Up Your Domain Name (www.yourblogname.com)
Now we need to set up your domain name using something called Name Servers. Name Servers allow people to see your website when they type in www.yourblogname.com.
Under the Domains tab:
- Click on your domain name, ie www.yourblogname.com
On the Domain Overview screen:
- Click the Name Servers tab on the left side (globe icon)
On the Name Servers screen:
- Select “Automatically point my domain to my hosting account” and select your hosting account.
- Click Save Name Servers
It can take 24-48 hours for your website to appear at www.yourblogname.com, but it often happens within a few minutes.
Now back to the Hosting tab:
- Click the gear icon next to your domain name
- Click “Manage WordPress.”
This will take us to your WordPress Dashboard. This is where you will spend most of your time when working on your website.
Let’s create your first blog post!
To see your blog in its current form, go to www.yourblogname.com.
If your nameservers have propagated, you can see that the bones of your site are already up and running – wasn’t that easy?
Now let’s start customizing the site with your content.
Create a post
On the left side of your dashboard, click the link “All Posts.” Here you will see the sample post that WordPress has created.
Click on the post title to update this post.
On the Edit Post screen, change the title and body of the post. Click the “Update” button.
Visit www.yourblogname.com and refresh the page. You should see your updates.
Congratulations!
You now have a brand spanking new blog.
There is so much more you can do, but for now, you are ready to finish up that first blog post and send it out to your friends, family, and colleagues!
Go forth and share your one-of-a-kind point of view with the world.
Questions? Email me and let me know.